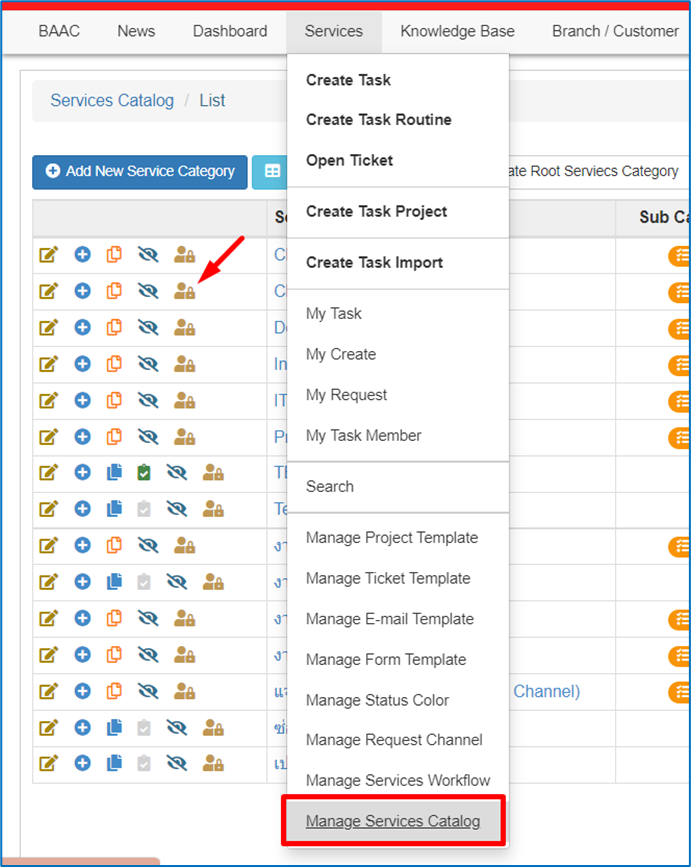
1. Lock access data ใน service category
กำหนด Privacy ของใบงาน ที่จำกัดให้เห็นข้อมูลบางส่วน
- ไปที่เมนู Services >> Manage Services Catalog
![](https://www.servicesf1.com/wp-content/uploads/2023/03/image-115.png)
![](https://www.servicesf1.com/wp-content/uploads/2023/03/image-117.png)
![](https://www.servicesf1.com/wp-content/uploads/2023/03/image-118.png)
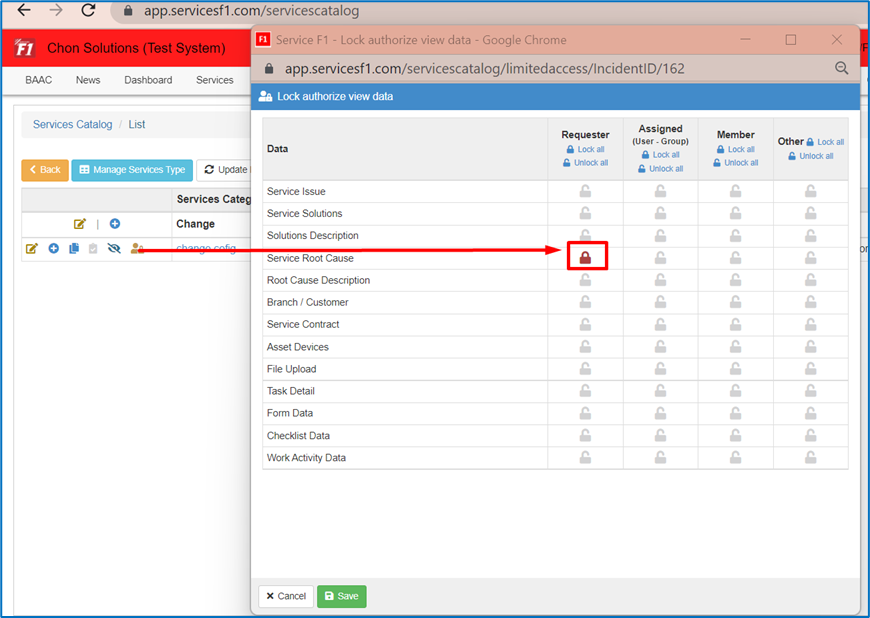
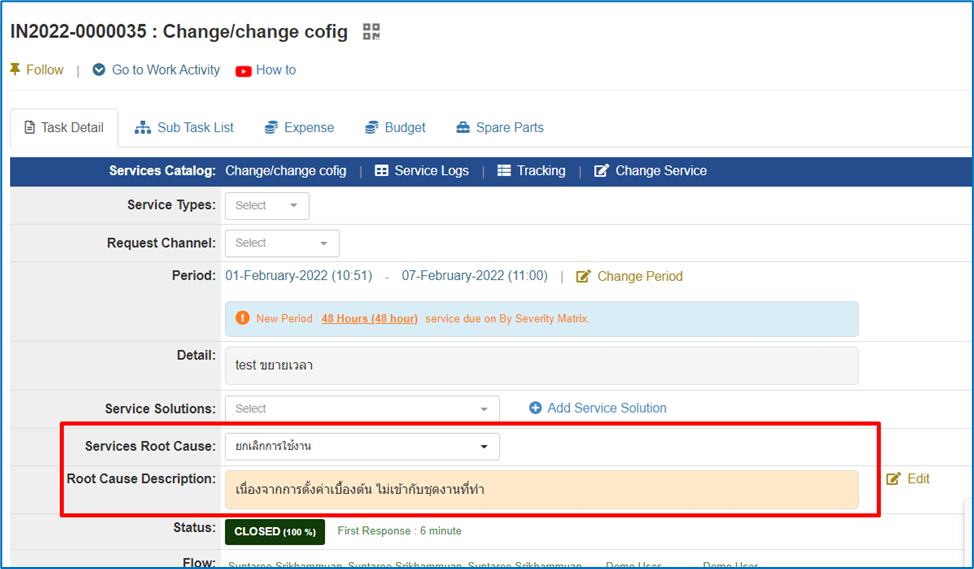
จากรูป : จำกัดการมองเห็นหัวข้อ Service Root cause ของ Requester
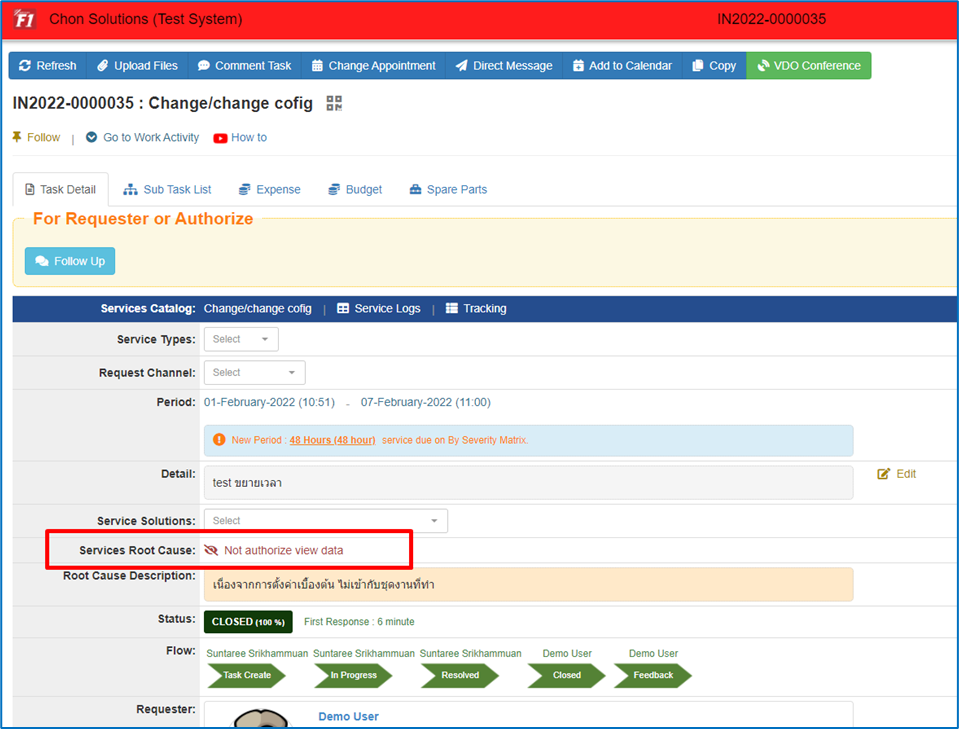
- ที่ใบงาน Requester จะไม่เห็นข้อมูลในหัวข้อ Services Root Cause ตามรูป
![](https://www.servicesf1.com/wp-content/uploads/2023/03/image-119.png)
จำกัดการมองเห็น Services Root Cause ของ Requester
2. Field root cause(dropdown) และ Field root cause(text area)
การตั้งค่าระบุสาเหตุของหัวข้อบริการ หรือการแจ้งปัญหานั้นๆ
- ไปที่เมนู Services >> Manage Services Catalog>>เลือก services catalog >> Edit >> มาที่หัวข้อ Service Root Cause
![](https://www.servicesf1.com/wp-content/uploads/2023/03/image-120.png)
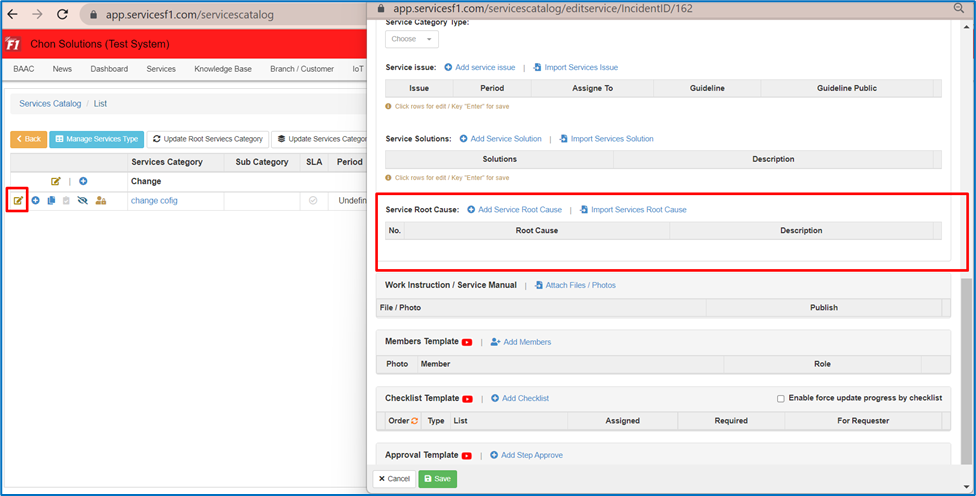
- Add Services Root cause หรือ Import Services Root Causeข้อมูลเข้าระบบ (หากมีจำนวนมาก)
![](https://www.servicesf1.com/wp-content/uploads/2023/03/image-121.png)
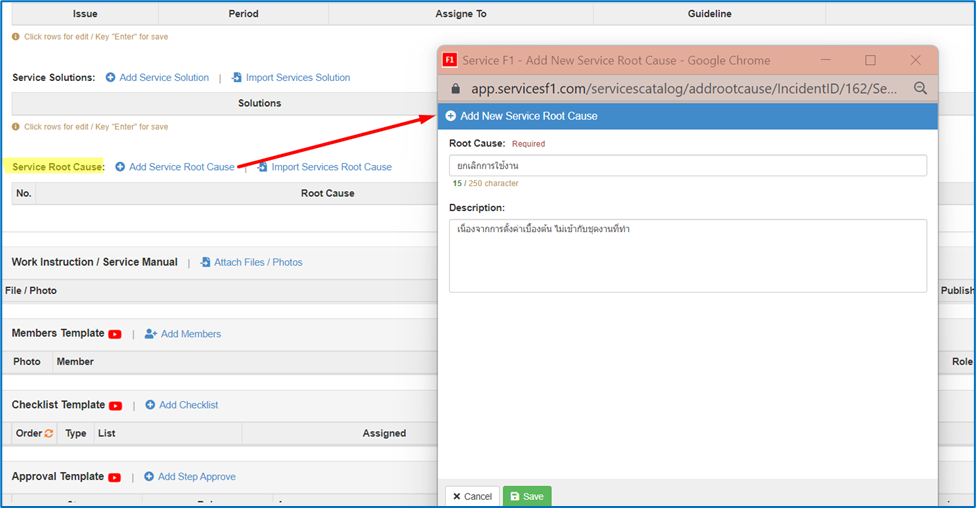
- การเรียกใช้ในหน้าของใบงาน
![](https://www.servicesf1.com/wp-content/uploads/2023/03/image-122.png)
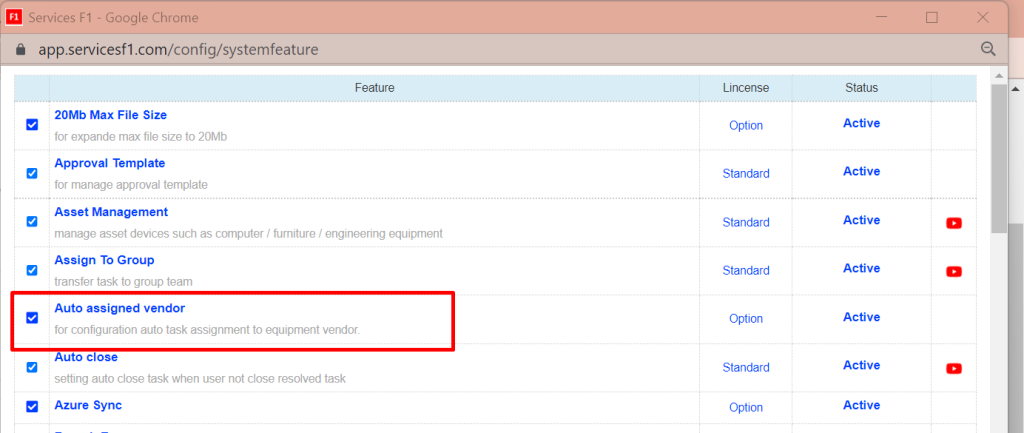
3. Import asset vendor auto assigned
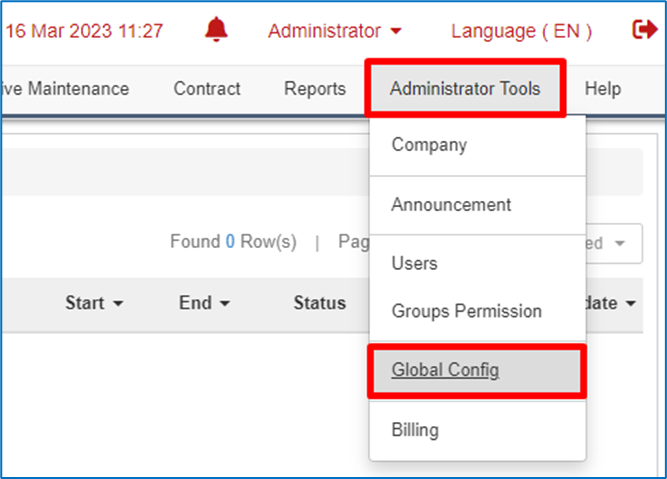
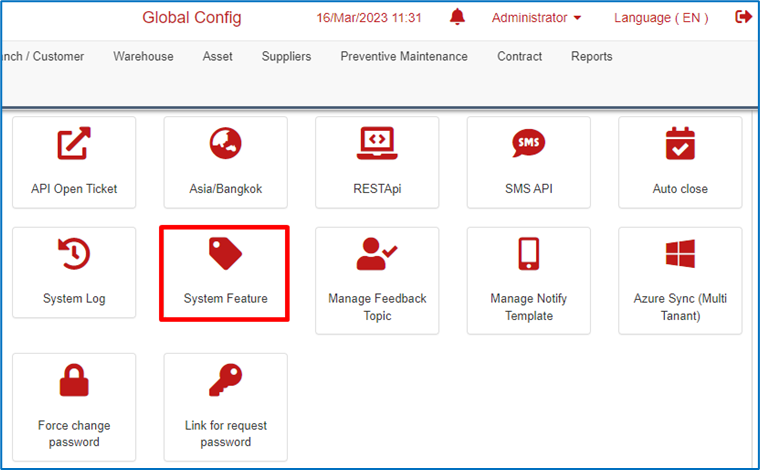
- Allow feature “Auto Assigned Vendor” ไปที่เมนู Global Config >> เลือก System Feature
![](https://www.servicesf1.com/wp-content/uploads/2023/03/image-123.png)
![](https://www.servicesf1.com/wp-content/uploads/2023/03/image-124.png)
![](https://www.servicesf1.com/wp-content/uploads/2023/04/image-1024x433.png)
- ไปที่เมนู Asset >> Devices List
![](https://www.servicesf1.com/wp-content/uploads/2023/04/image-1-1024x304.png)
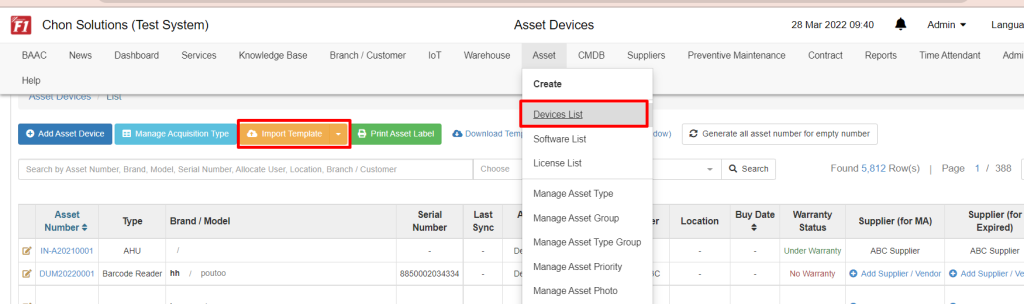
- เลือก Import Auto Assigned Vendor Template
![](https://cdn.document360.io/ceb8bb61-2628-4e4b-9e38-59b8496a560a/Images/Documentation/image-1648435400263.png)
![](https://cdn.document360.io/ceb8bb61-2628-4e4b-9e38-59b8496a560a/Images/Documentation/image-1648435593258.png)
4. Asset feature Add description
- ใน asset เพิ่มปุ่ม ให้กลับไป asset group ได้
![](https://cdn.document360.io/ceb8bb61-2628-4e4b-9e38-59b8496a560a/Images/Documentation/image-1648440831440.png)
เพิ่มให้ระบุ not hardware ใน asset type ได้
- ไปที่ Asset >> Manage Asset Type
![](https://cdn.document360.io/ceb8bb61-2628-4e4b-9e38-59b8496a560a/Images/Documentation/image-1648440981973.png)
Permisson “Set buy date retrospectively”
- ตั้งค่าเพื่อ คีย์วันที่ย้อนหลังได้ เช่น buy date
![](https://cdn.document360.io/ceb8bb61-2628-4e4b-9e38-59b8496a560a/Images/Documentation/image-1652154414264.png)
asset life expected
- asset life expected ใน asset type group สามารถระบุ อายุอุปกรณ์ที่ละหลาย ๆ ตัวได้
![](https://cdn.document360.io/ceb8bb61-2628-4e4b-9e38-59b8496a560a/Images/Documentation/image-1652755525669.png)
- ไปที่เมนู Asset >> Manage Asset Type Group
![](https://cdn.document360.io/ceb8bb61-2628-4e4b-9e38-59b8496a560a/Images/Documentation/image-1652755630247.png)
- เลือกที่ Manage Asset Type ตามรูปเพื่อเข้าไปกำหนด อายุการใช้งาน
![](https://cdn.document360.io/ceb8bb61-2628-4e4b-9e38-59b8496a560a/Images/Documentation/image-1652755713170.png)
5. การเพิ่ม Asset Status (Super Admin)
การเพิ่ม Asset Status (สำหรับ User Admin ) ยังไม่ได้เปิดให้ลูกค้าเพิ่มได้เอง
- Global Config >> ที่หัวข้อ Services F1 : Super Administrator >> เลือก Manage asset status
![](https://cdn.document360.io/ceb8bb61-2628-4e4b-9e38-59b8496a560a/Images/Documentation/image-1656301111325.png)
- เพิ่ม Status
![](https://cdn.document360.io/ceb8bb61-2628-4e4b-9e38-59b8496a560a/Images/Documentation/image-1656301448416.png)